This chapter contains the following topics:
Use this selection to inquire into the following types of information:
| • | Inventory History |
| • | Items |
| • | Lot Numbers |
| • | Serial History |
| • | Serial Numbers |
| • | Work Order History |
| • | Work Orders |
For an item, the display includes all information in Items for the item.
For serial numbers, all the serial numbers for a serialized item are displayed, both unsold and sold.
For lot numbers, all the lot numbers for a lot-controlled item can be displayed.
For work orders, information on work order that has been issued (using Issue work orders) or closed (using Close work orders) is available.
Use this selection to view Inventory history detail.
If you prefer to run the Inventory History report, see the Inventory History Report chapter.
For a report of inventory history see the Inventory History Report.
Select
Inventory history from the View menu.
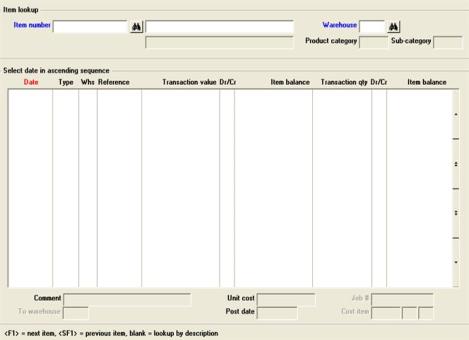
Graphical Mode
The following screen displays:
Once an item is selected, you may select View A/R invoice history from the Options menu. If there is a matching invoice history record to the number in the reference field in the list box the invoice or credit memo displays. If there is no matching record the record closest to the one selected displays. See the A/R documentation for information on view invoice history. This option is not available if A/R is not installed.
Item number
Options
Enter the item number or use on of the options:
|
<F1> |
For the next item number |
|
<SF1> |
For the previous item number |
|
<Enter> |
To lookup by item description |
This field is only available in graphical mode.
If you selected <Enter> on the item number field, then you may look up by item description.
|
<F1> |
For the next item description |
|
<SF1> |
For the previous item description |
|
<Enter> |
To lookup by item number |
Options
Enter the warehouse code, or use one of the options:
|
<F1> |
For the next warehouse |
|
<F5> |
For "All" warehouses |
After selecting the warehouse then all the transactions will display in the list box for the selected item. Use the sorting arrow to toggle between viewing the history dates in descending or ascending order.
Select the <Esc> key or click on the Exit button to return to the menu.
Character Mode
The following screen displays:
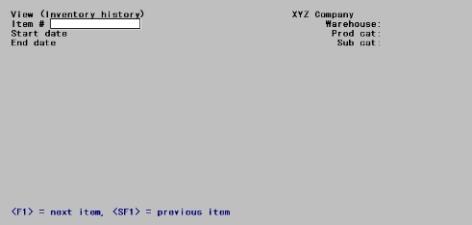
Enter the information as follows:
Item number
Options
Enter the item number or use on of the options:
|
<F1> |
For the next item number |
|
<SF1> |
For the previous item number |
Warehouse
Options
Enter the warehouse code, or use one of the options:
|
<F1> |
For the next warehouse |
|
<F5> |
For "All" warehouses |
Start date and End date
These fields are only available in character mode.
Enter the date range or press <F2> for Earliest and Latest.
Use the View (Items) selection to inquire into item and status information for an item. The information shown is the same as that in Items and Statuses for the item, but changes cannot be made through this selection.
Select
Items from the View menu.
A list box displays where you may select an item:
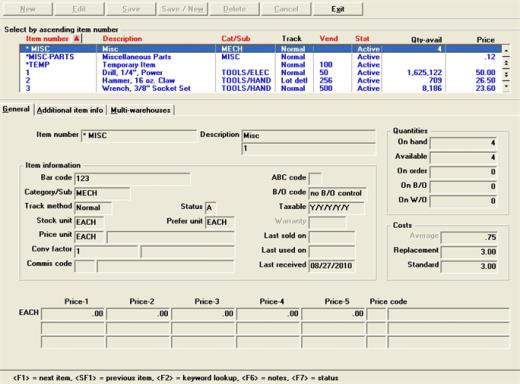
From the above list box you may sort the items by item number, item description, category, vendor and item status.While viewing an item's information, you have these options:
|
<Esc> |
To specify another item to inquire into |
|
<F1> or down arrow |
If the focus is on the list box only, use to display the next item |
|
<SF1> or up arrow |
If the focus is on the list box only, use to display the previous item |
|
<F2> |
To lookup an item by keyword. See the Item searched by section in the Control information chapter |
|
<F3> |
To display warranty program for a serialized item only |
|
<F5> |
To view alternate items for the current item |
|
<F6> |
To view notes for the current item. If the item has notes then there will be a red ampersand to the left of the Item number on the general tab |
|
<F7> |
To view the status tab for the current item |
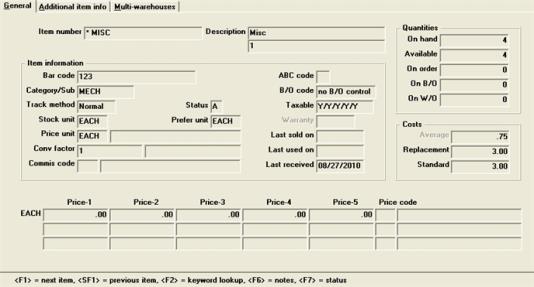
There are three tabs on this screen.
Tab 1 looks something like this:
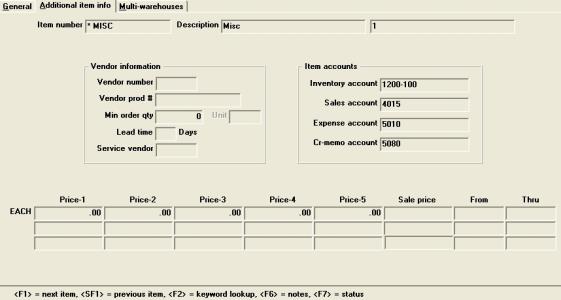
Tab 2 has the vendor, accounts and price information and looks like this:
Tab 3 shows the status of each warehouse and is similar to this:
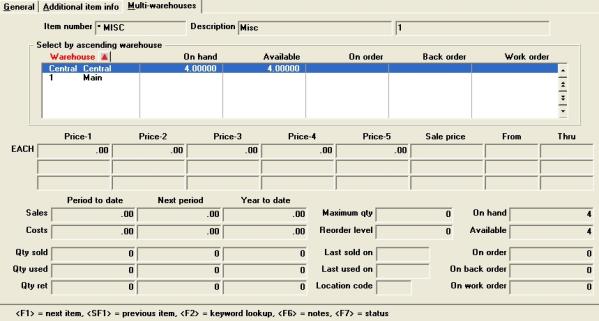
Information from up to 6 warehouses display in the lower list box.
Select the <Esc> key or click on the Exit button to return to the menu.
Character Mode
The following screen displays:
Options
Enter the item number of the item you wish to inquire into, or use one of the options:
|
<F1> |
To display the next item number |
|
<SF1> |
To display the previous item |
|
<F2> |
To look up the item by keyword |
|
<Enter> |
To look up the item by description |
Additional information is displayed when applicable for an item. This includes pricing unit, conversion factor, preferred unit, alternate unit prices, and quantity on back order. Quantity on order is shown if you checked the box to the Using Purchasing order field in I/C Control information. Quantity on work order is also shown if you are using kits.
Vendor item information is shown if it exists for the item, and warranty information appears for serialized items.
If any current or upcoming sale prices exist for the item, they are shown instead of the price code.
The item's average and replacement costs are only shown when the user has access to either Items, Inventory, or Reports (Stock status). The item's standard cost is also shown if you are using the Standard valuation method.
Options
While viewing an item's information, you have these options:
|
<Esc> |
To specify another item to inquire into |
|
<F1> |
To display the next item |
|
<SF1> |
To display the previous item |
|
<F2> |
To display other price |
|
<F3> |
To display warranty program |
|
<F5> |
To view alternate items for the current item |
|
<F6> |
To view notes for the current item |
|
<F7> |
To view status information for the current item |
If you press <F5>, a window appears showing the item number and description of each alternate item that has been defined for the current item.
If you press <F6>, existing notes for the item are displayed. To scan through existing notes for an item, use the keys as shown at the bottom of the screen (<PgUp>, <PgDn>, <Home>, <End>, and <F1>). Item notes cannot be added or changed through this selection.
If you press <F7>, a screen displays for you to view status information.
When you press <F7> to view status information for an item, if you are using multi-warehousing, you are asked to specify the warehouse to inquire into.
Options
Enter the warehouse code or use one of the options:
|
<F1> |
For the next warehouse |
|
<SF1> |
For the previous warehouse |
|
<Enter> |
For the Central warehouse |
If you select warehouse 1, the status information screen displays similar to this:
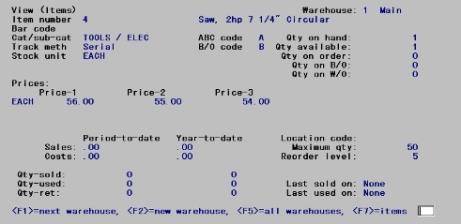
Quantities and dates (Last sold on and Last used on) on this screen are those for the particular warehouse.
If warehouse-specific item or sale prices are defined, they display on this screen. Otherwise, the prices shown are those in Items.
Options
While viewing status information, you can use one of the options:
|
<Esc> |
To specify another item to inquire into |
|
<F1> |
To view status information for the next warehouse |
|
<F2> |
To specify a different warehouse for inquiry |
|
<F5> |
To view item availability in all warehouses |
|
<F7> |
To re-display the item inquiry screen for the current item |
Use the View (Lot numbers) selection to inquire into the lot numbers for an item.
Select
Lot numbers from the View menu.
Graphical Mode
The following screen displays:
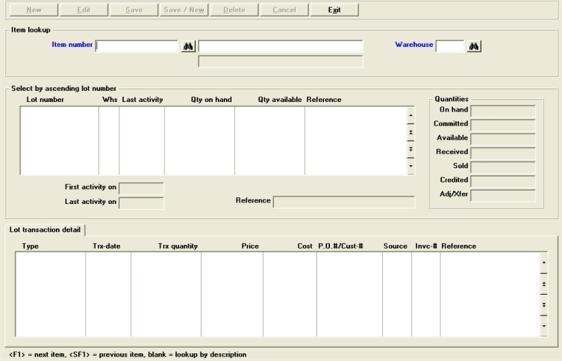
Enter the item number of the lot-controlled item.
Options
You may also use one of the options:
|
<F1> |
To display the next lot–controlled item number |
|
<SF1> |
To display the previous lot-controlled item numbers |
|
<Enter> |
To look up the lot-controlled item by description |
|
Format |
Up to 15 digits |
This field appears only if you are using multi-warehousing.
Enter the warehouse code for which you want to view lot numbers.
Options
You may also use one of the options:
|
<Enter> |
For the Central warehouse |
|
<F5> |
For "All" warehouses |
After entering a lot number in then the lot data displays in the list box. With the focus on the upper list box, type the lot number to locate it. Use the sorting arrow to toggle between viewing the numbers in descending or ascending order.
Once the lot is located, lot transaction information displays in the lower list box on the Lot transaction detail tab.
Select the <Esc> key or click on the Exit button to return to the menu.
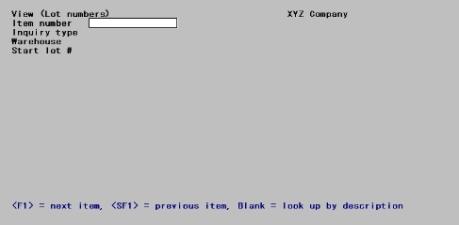
Character Mode
The following screen displays:
A summary or detail inquiry can be requested.
A summary inquiry shows the following information for each lot number:
|
Warehouse |
Quantity received |
|
Date of last activity |
Quantity sold |
|
Quantity on- hand |
Quantity credited |
|
Quantity available |
Quantity adjusted or |
|
Reference text |
Transferred |
A detail inquiry for an item with a lot detail tracking method also shows the following information for each transaction processed for the lot number:
|
Type (transaction) |
Purchase Order number |
|
Trx date |
Customer number |
|
Trx quantity |
Source |
|
Price |
Invoice number |
|
Cost |
Reference |
Enter the information as follows:
Item number
Enter the item number of the lot-controlled item.
Options
You may also use one of the options:
|
<F1> |
To display the next lot–controlled item number |
|
<SF1> |
To display the previous lot-controlled item numbers |
|
<Enter> |
To look up the lot-controlled item by description |
|
Format |
Up to 15 digits |
Inquiry type
This field can only be entered in Character Mode.
Enter D to view the detail of a lot number for the item, or press <Enter> to default to S for a summary of the item's lot numbers.
|
Format |
One letter, D or S. The default is S. |
Warehouse
This field appears only if you are using multi-warehousing.
Enter the warehouse code for which you want to view lot numbers.
Options
You may also use one of the options:
|
<Enter> |
For the Central warehouse |
|
<F5> |
For "All" warehouses |
For a summary lot number inquiry, you are asked to enter:
Start lot #
This field can only be entered in Character Mode.
Enter the starting lot number to be displayed, or press <F2> to start from the First lot number for the item.
|
Format |
Up to 15 characters |
Lot-#
This field can only be entered in Character Mode.
If you selected Detail inquiry, enter the lot number to be displayed.
For a summary inquiry, up to 15 lot numbers display on the screen at one time.
Options
If there are more than 15 lot numbers to view, use one of these options:
|
<F1> |
To view more lot numbers |
|
<PgUp> |
To return to a previous screen display of lot numbers |
|
<Enter> |
To view the first activity date, quantity received, quantity sold, quantity credited, and the quantity adjusted for each lot number. |
|
Format |
Up to 15 digits |
When you have finished reviewing the lot numbers, press <Esc>. You can then enter the item number of the next lot-controlled item that you want to inquire into.
You can also press <Esc> when the <PgUp> or <PgDn> message is displayed to end inquiry into a lot-controlled item before you reach the end of that item.
For a detail inquiry, up to 12 transactions for the lot display on the screen at one time.
Options
If there are more than 12 transactions, use one of these options:
|
<PgDn> |
To view additional transactions for the lot |
|
<PgUp> |
To return to a previous screen display of lot transactions |
When you have finished reviewing the transaction detail, press <Esc>. You can then enter the item number of the next lot-controlled item that you want to inquire into.
You can also press <Esc> when the <PgUp> or <PgDn> message is displayed to end inquiry of a lot-controlled item before you reach the end of that item.
Select
Serial history from the View menu.
Graphical Mode
The following screen displays.
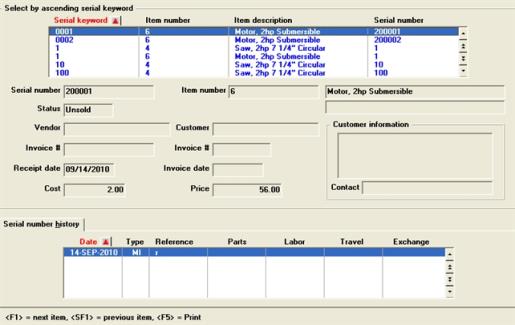
Serial numbers for all items display in the upper list box.
Enter a valid serial number, or partial serial number and the program will display the exact or closest matching numbers in the list box. With the focus on the list box, you may also use the arrow keys, <Page up>/<Page down> and <Home>/<End> keys to find the serial number. Use the sorting arrow to toggle between viewing the numbers in descending or ascending order.
The history details about the selected serial number display in the Serial number history tab list box below. Use the sorting arrow to toggle between viewing the history in descending or ascending date order.
Select the <Esc> key or click on the Exit button to return to the menu.
Character Mode
The following screen displays:
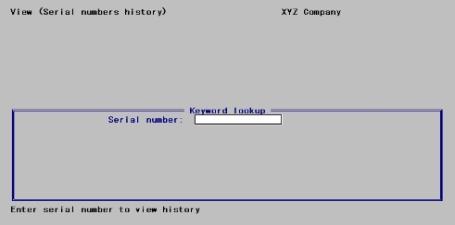
Enter the information as follows:
Enter a valid serial number, or partial serial number in the lookup screen. All matching serial numbers display. Select the item you wish to view and press <Enter>.
Options
You may select from one of the following options:
|
<Esc> |
To reselect |
|
<F2> |
To view history |
|
<F5> |
To print history |
Use the View (Serial numbers) selection to inquire into the unsold and/or sold serial numbers for an item.
Select
Serial numbers from the View menu.
Graphical Mode
The following screen displays:
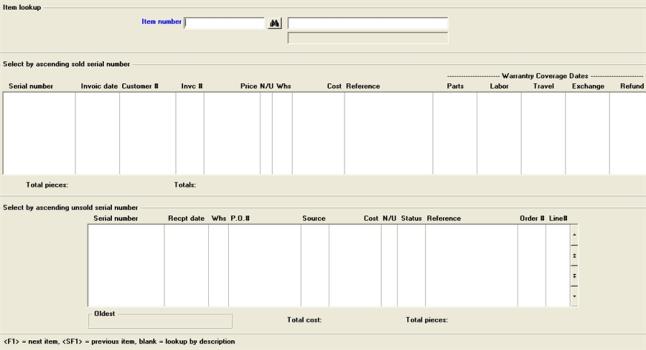
After an item number is entered, both sold and unsold serial numbers display. You may select to view the data by serial number for either box in ascending or descending order.
(Description)
Options
Enter the item number of the serialized item, or use one of the options:
|
<F1> |
To display the next serialized item number |
|
<SF1> |
To display the previous serialized item number |
|
<Enter> |
To look up the serialized item by description |
|
Format |
Up to 15 characters |
|
Example |
Press <F1> and then press <Enter>. |
Once a number for a serialized item is entered, if you have a large amount of history it may take a few moments to view all the data. The sold serial numbers display in the upper list box and the unsold serial numbers in the lower list box.
To locate a serial number in either list box you may type the serial number or use the arrow keys, <PgDn>, PgUp>, <Home> and <End> keys.
Some of the fields that display are different depending if the item is sold or unsold. The following is a list of fields that display for each list box:
| Field | Sold List Box | Unsold List Box |
| Invoice date | Yes | |
| Customer number | Yes | |
| Invoice number | Yes | |
| Price | Yes | |
| 5 warranty dates that include Parts, Labor, Travel, Exchange or User definable other. | Yes | |
| Cost | Yes | Yes |
| New or Used code | Yes | Yes |
| Warehouse | Yes | Yes |
| Reference | Yes | Yes |
| Order number | Yes | |
| Receipt date | Yes | |
| Purchase order # | Yes | |
| Source (Vendor) | Yes | |
| Status (committed or loaned) | Yes | |
| Order # | Yes | |
| Line # | Yes |
For both list boxes, use the sorting arrow to toggle between viewing the serial numbers in descending or ascending order.
Select the <Esc> key or click on the Exit button to return to the menu.
Character Mode
The following screen displays:
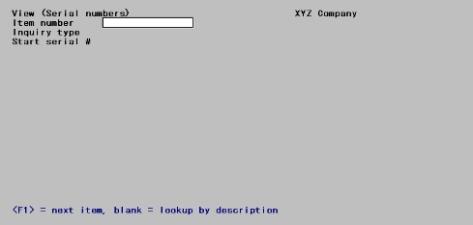
Enter the information as follows:
Item number
(Description)
Options
Enter the item number of the serialized item, or use one of the options:
|
<F1> |
To display the next serialized item number |
|
<SF1> |
To display the previous serialized item number |
|
<Enter> |
To look up the serialized item by description |
|
Format |
Up to 15 characters |
|
Example |
Press <F1> and then press <Enter>. |
Inquiry type
This field may only be entered in character mode.
Enter the type of inquiry, either U to view unsold serial numbers for the item or S to view sold serial numbers.
|
Format |
One letter, either U or S. There is no default. |
Start serial #
This field may only be entered in character mode.
Enter the serial number of the first item to be displayed, or press <F2> to default to the First serial number for the item.
Up to 13 serial numbers display on the screen at one time.
Options
If there are more than 13 serial numbers to view, You may also use one of these options:
|
<PgDn> |
To view more serial numbers |
|
<PgUp> |
To return to a previous screen display of serial numbers |
|
<Enter> |
To view the Reference text for each serial number displayed on the screen. |
When the last serial number is displayed, serial number totals are shown and information on the oldest received serial number displays at the bottom of the screen.
For sold serial numbers, the invoice date, customer number, invoice number, price, warranty dates, cost, new or used code, warehouse, and reference text are shown for each serial number.
When you have finished reviewing the serial numbers, press <Esc>. You can then enter the number of the next serialized item that you want to inquire into.
You can also press <Esc> when the <PgUp> or <PgDn> message is displayed to end inquiry into a serialized item before you reach the end of that item.
Use the View (Work order history) selection to view work orders that have been closed (using Close work orders). Immediate work orders that have been issued may also be viewed using this selection.
Select
Work order history from the View menu.
A screen similar to this displays:
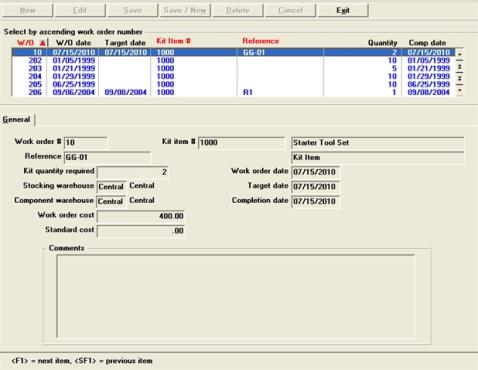
Up to six closed work orders display in the list box at one time. To scan through the closed work orders, use the arrow keys <PgUp>, <PgDn>, <Home>, and <End>.
Use the sorting arrow to toggle between viewing the serial numbers in descending or ascending order by Work order #, Kit item # and Reference.
To view open work orders, select View work orders from the Options menu.
Select the <Esc> key or click on the Exit button to return to the menu.
Character Mode
A screen similar to the following displays:
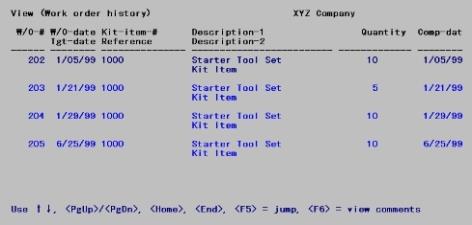
Up to five closed work orders display on the screen at one time. To scan through the closed work orders, use the keys as shown at the bottom of the screen (<PgUp>, <PgDn>, <Home>, and <End>).
Options
You may also use the options:
|
<F5> |
To jump directly to the W/O you wish to view, either by W/O number or reference |
|
<F6> |
To view comments entered for this W/O |
|
<Esc> |
When you are finished viewing W/O history |
Press <Esc> when you are finished viewing W/O history.
Select
Work orders from the View menu.
Graphical Mode
The following screen displays:
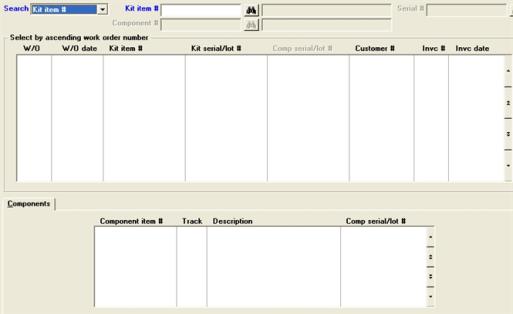
To view work order history, select View work order history from the Options menu.
There are options when searching for a work order.
|
Option |
Description |
|---|---|
|
Kit item # |
Search for the number of the kit item |
|
Kit item/Serial # |
Search for the serial number of the kit item |
|
Component # |
Search for the number of the component item |
|
Component/Serial |
Search for the serial number of a component item |
Component #
Enter a valid kit item # or component #.
Enter the serial or lot number for the component or kit item.
When you enter a valid kit item # (or component #), in the list box a list of Work orders display that contain that number.
For the work selected in the upper list box the work order components display in the lower list box.
Select the <Esc> key or click on the Exit button to return to the menu.
Character Mode
The following screen displays:
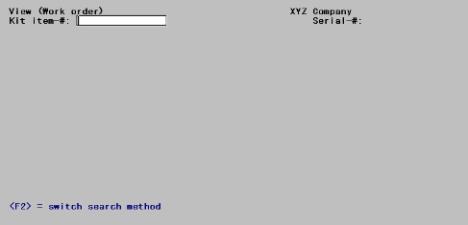
In character mode, on the Kit item # field, enter the kit item # or press <F2> to search by component-#. Select <Enter> to serial by serial number.